
 For those who are curious about weaving with wool roving, but haven’t tried it just yet, this post is for you. Wool roving is a beautiful way to add texture and volume to your weaves and it’s really easy to use too. So what is wool roving? There are a lot of steps to change fleece into yarn (if you want to know more, I recently read a great post about the process here). To give you a general idea, it is wool that has been processed to the point where it is ready to be spun into yarn. So roving is kind of like a very puffy yarn.
I’m going to show you how to plain weave with roving, and also how to soumak with roving. To be technical, what I am using in my weave is called wool top. Wool roving and wool top are visually the same more or less. The difference is wool top is processed by hand and all fibers are going in the same direction. Wool roving is processed by a mill so not all the fibers are going in the same direction and roving tends to be fuzzier. The directions for weaving roving and top are the same.
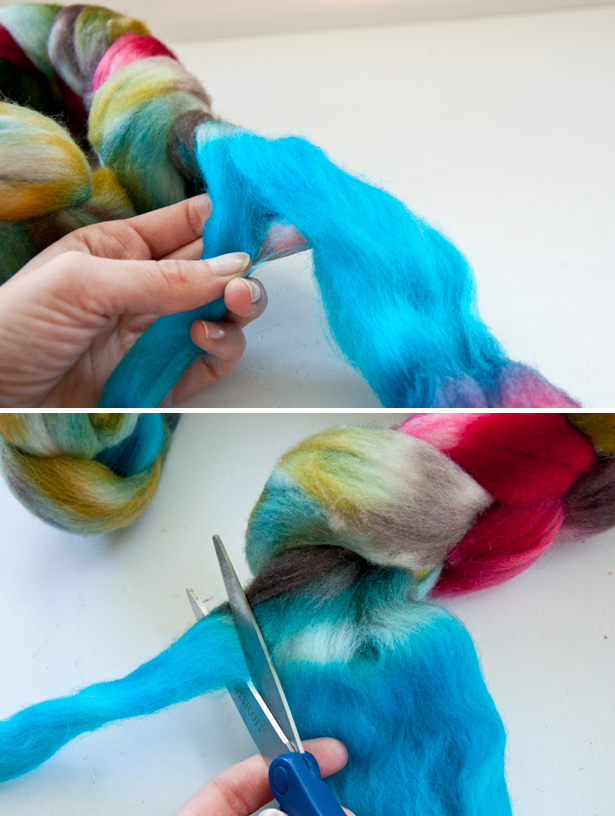
 To start I gently separated an amount of fiber at the width I wanted. I then cut the amount off at the length I desired. For the plain weave, I cut a piece that was about 3 inches longer on both ends then the area I wanted it to cover. This allowed me to fluff the roving and also have enough ends to weave in. For the soumak weave, I cut a piece that was double the area that I wanted to weave, plus the 3 inches extra for both ends.
Roving Plain Weave

step 1| I put some support rows in my weave before adding my roving. The support rows are important because roving is incredibly stretchy and has little structure of it’s own, so it will not stop your warp threads from spreading and trust me you don’t want your warp threads to spread after you take it off the loom. You can put in just two support rows if you don’t want them to show much.
step 2| Next I took the very edge of my roving and plain wove it between a few warp threads. This will be in the back of my weave and will secure my roving.
step 3| I then start weaving my roving just as I would a plain weave, however since it is so thick, I need to pick up the warps and bring the roving through with my fingers. As you can see in the picture, I’m weaving the roving at a diagonal so that I don’t pull it straight.
step 4| Once the roving is woven, I then use my fingers to slide it up the warps into place and also pinch it and pull a little to fluff it. At this point you can really play around with the roving to shape it how you want.

step 5| To finish the roving, take the roving end and weave it in some of the back warps to secure it
Roving Soumak Weave

step 1| I’ve posted the steps for creating the soumak weave here and you can follow those steps to soumak weave your roving. Again I would recommend weaving it with your fingers due to the thickness of it and the fact that too much stress on the roving might pull the fibers apart. For this weave, I’m following these soumak steps (video of process here):
- Cut a long piece of yarn
- Loop it around the first or last warp thread (first in my case as I am weaving left to right)
- Spread the two pieces of yarn, take the cut ends and thread them through the middle and under the next warp thread and out through the middle again (always through the middle!)
- Repeat!!!!
This soumak weave technique is much quicker, but also I found that it makes creating the soumak with roving much easier. So pick which soumak technique you want to use and follow it with the roving.
step 2| Once the soumak is woven, take your roving ends and weave them in a few of the back warp threads to secure the roving.

I also wanted to mention that I made my soumak weave with the roving on the warps by itself, and then filled in the regular yarn weaving. This is because it is easier to weave the roving on bare warps that will let me pull them up pretty wide. If I had woven all my warps and then added the roving it would have been harder to pull the warp threads up to fit the roving in.
I was really excited to write this post, because I just love how roving looks in weaves. Have you tried adding wool roving to your weaves yet? Did you run into any issues? I was apprehensive myself before trying it, but it works pretty similarly to regular yarn.
Happy Weaving!
||Shop this post||
Wool Top from Hey Lady Hey
Lily Sugar’n Cream Solids Yarn in White
Cotton Warp in White
This post contains affiliate links. If you purchase through these links, you’ll help support The Weaving Loom, and you’ll receive some amazing stuff, too. Whohoo!


Kamille
December 10, 2015 at 12:55 pmHi Kate,
I have a question about roving. I have used it in some of my weaves following your technique and also the techniques on the Loom and Spindle blog. What I find is that when I take the weaving off the loom, the roving sections have a tendency to curl the weave toward the back rather than lying flat. Any ideas about what I can do to prevent this? Thanks!
Kamille
Kate
December 11, 2015 at 8:58 pmHi Kamille,
The issue with roving is that it has a lot of give to it, so it allows the warp threads to spread apart once it’s off the loom. I assume the area you wove with the roving was very large? I’m not sure what your design is, but is it possible to hide a row or two of plain weave between your roving rows? This would help hold your warp threads in place so that once you take it off the loom, the warp won’t spread. If you can put plain rows in, I would put them in every inch or two to add stability. If you can’t put plain rows in, because they will ruin your design, then I would suggest adding some support rows in the back of your weave. I have an example of when I had to do this because my weave got wavy after taking it off the loom
https://www.theweavingloom.com/how-to-fix-waves-after-taking-your-weave-off-the-loom/
In my situation, I also did not have enough structure, which allowed my warp threads to spread. If you added these support rows in the back, they would hold your roving in place and not allow it to pull forward (causing the edges to curl back).
I hope this helps! I’m just making an assumption of what your issue is, but if my suggests don’t help let me know. If you still need help, it would be helpful for me to see a picture of what your issue is.
Thanks!
Devon
February 3, 2016 at 5:46 amHi,
Great tutorial. It looks like you are wrapping every 5th warp with roving for the soumak weave. Am I seeing that correctly? Does that cause any issues structurally when you take the weaving off the loom? I tried using a lot of soumak roving on a small loom and the structure fell apart when removed from the loom. I did basic weave above and below the roving, but it wasn’t enough. Any tips are very welcome! Thank you!
Kate
February 3, 2016 at 3:52 pmHi Devon, I might have wrapped it every 4th? but I really don’t remember so it could have been the 5th warp thread. I was mostly wrapping where it looked the nicest on the front of my weave. My weave didn’t have structural issues after taking it off the loom, but I just had that row of the soumak with plain weave surrounding it. When you made something similar, did you do more rows of soumak? The more rows done with the roving the more unstable the weave becomes, because the warps start to separate once cut off the loom. If you were to make multiple rows of soumak with roving, I would hide a row or two of plain weave between and since the roving is so puffy it is easy to hide. I hope that helps!
Devon
February 3, 2016 at 3:56 pmI did 2 rows of soumak with roving. I will definitely hide some plain weave in between next time. I think that will fix it. Thank you so much!
emilia kalyvides
July 22, 2016 at 2:09 amHi, Love this tutorial, I’m currently working on a large roving weave, I have used a mixture of tight, loose and twisted techniques but all basic weaving, I was intending to use the basic weave in a chunky yarn at the top and bottom to secure the work, do you think i should use some intermittently also? Thanks, Emilia
Kate
July 23, 2016 at 7:49 amHi Emilia, I think the chunky yarn at the top and bottom woven in the basic weave will work. You just need something to hold the warp threads in place. The roving will definitely let your warp threads spread once the weave is cut from the loom, so the “lock” rows are important. Let me know if you have more questions on this.